Let's face it: Branson tractor parts diagrams can seem daunting. But mastering them is key to saving time and money on repairs. This guide provides a step-by-step approach to confidently identifying the correct parts, every time. For similar diagrams on other brands, check out this helpful resource: Case IH diagrams.
Understanding Your Branson Tractor's Parts Diagram
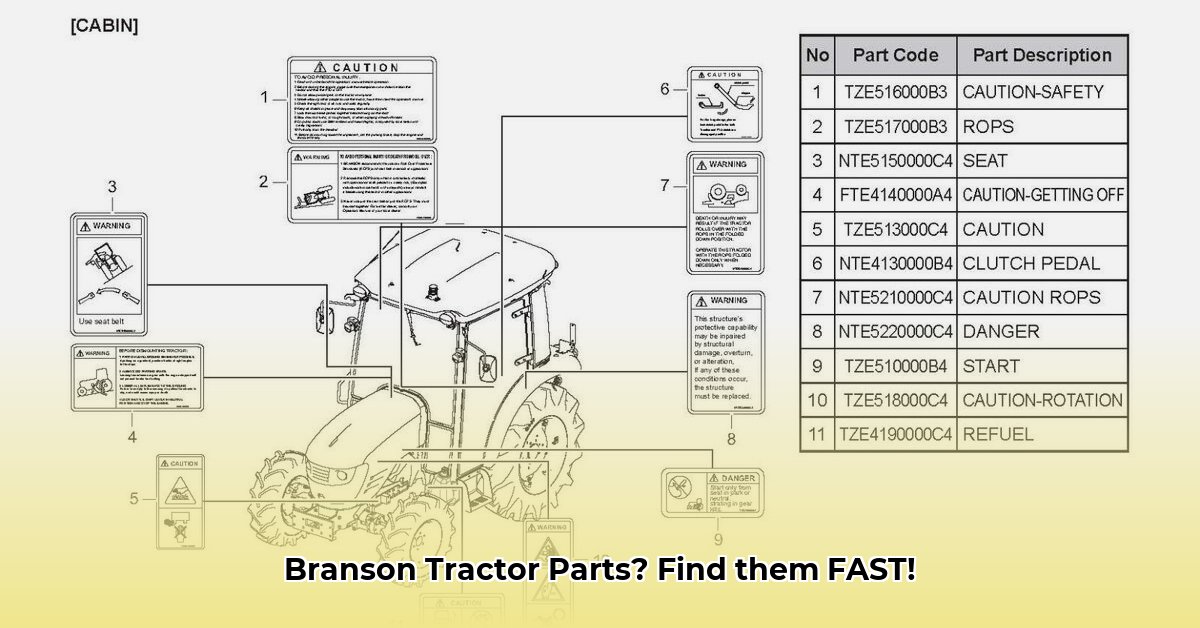
Your Branson tractor's parts diagram is essentially a detailed blueprint. Understanding it is crucial for efficient repairs and avoiding costly mistakes. First, locate your tractor's model number (usually found on a plate near the seat or engine). This number is essential because diagrams are model-specific; a diagram for a 2520 model won't work for a 3520, even if they appear similar. This model number is your key to accessing the correct diagram. Don't skip this step!
Deciphering Part Numbers and Codes
Branson parts diagrams use alphanumeric codes to uniquely identify each component. These codes, often found on the parts themselves, are critical for accurate ordering. A typical part number might look like this: 7530-12345. These numbers aren't random; they often contain information about the part’s function and sometimes even revision numbers indicating design updates. Always double-check compatibility with your exact tractor model to avoid ordering the wrong part.
Locating Specific Parts on the Diagram: The Exploded View
Most Branson diagrams utilize an "exploded view," presenting the tractor's components as if disassembled and laid out for easy identification. This visual representation shows how parts fit together. Use the diagram's legend (often a separate key) to match part numbers with specific components. Take your time; rushing can lead to errors. If the diagram's print is small, use a magnifying glass or zoom in on a digital copy. Remember, accuracy is paramount—this saves you time and avoids ordering the wrong component.
Using Online Resources to Find Your Parts
Many online retailers sell Branson parts and often provide access to their diagrams. However, inconsistencies and typos can occur. Before ordering, meticulously compare the part number from the diagram with the retailer's listing. Cross-referencing multiple sources and comparing images of the part with the ones found on the website may be helpful. Remember that visually similar parts may have critical differences.
Common Mistakes to Avoid When Ordering Parts
The most frequent mistake is rushing the process. Take your time, carefully comparing the part number on your diagram with the retailer's listing. Another common error is ordering parts based solely on visual similarity without checking the part number. Even slight variations can make a part incompatible. Finally, always compare pricing from several reputable sources before committing to a purchase. Prices can vary significantly!
Troubleshooting Common Part Identification Issues
If you're still struggling, review your diagram thoroughly. Check if there are alternative part designations or different views of the part. If this doesn't help, contact your local Branson dealer or utilize online tractor forums for assistance. They can often provide additional support and access to resources you may not find online. Providing clear images of the part in question can be a huge help in expediting the identification process. Don’t hesitate to ask for help; it’s better than ordering an incorrect part.
A Quick Troubleshooting Guide
| Problem | Solution |
|---|---|
| Incorrect Part Number | Double-check the diagram and retailer’s listing; compare images if possible. |
| Part Not Found | Consult your Branson dealer or check online tractor forums. |
| Diagram is Unclear | Use a magnifying glass or find a higher-resolution version online. |
| Pricing Inconsistencies | Compare prices from at least three different reputable retailers. |
| Part Appears Discontinued | Contact Branson directly or explore alternative parts suppliers. |
Mastering Branson tractor parts diagrams empowers you with greater control over maintenance and potential cost savings. Take your time, be methodical, and don't hesitate to seek help when needed. Your local mechanic or online communities can offer valuable assistance. Remember, patience and accuracy are key to successful repair.